Express学习笔记

Express学习笔记
kifExpress的安装
npm install express -g脚手架工具
安装express的脚手架工具express-generator
npm install express-generator -g创建项目
express express-demo安装依赖
cd express-demo && npm install运行
npm start在浏览器里面输入:http://localhost:3000/
路由
路由方法
Express方法源于 HTTP 方法之一,附加到 express 类的实例。它可请求的方法包括:
get、post、put、head、delete、options、trace、copy、lock、mkcol、move、purge、propfind、proppatch、unlock、report、mkactivity、checkout、merge、m-search、notify、subscribe、unsubscribe、patch、search 和 connect。
路径
Express路径包含三种表达形式,分别为字符串、字符串模式、正则表达式
1.字符串路径
app.get("/login",function(req,res){
	res.send("kif");
})
此路径地址将与/login匹配
2.字符串模式路径
app.get("/ab+cd",function(req,res){
	res.send("kif");
})
此路径地址将与acd和abcd匹配
3.正则表达式路径
app.get(/^a/,function(req,res){
	res.send("kif");
})
匹配开头必须是a的路径
eg:
const express = require("express");
var app = express();

app.get("/",function(req,res){
	res.send(`<h1>主页</h1>`);
});
app.get("/login",function(req,res){
	res.send(“登录页面”);
});
app.get("/registe",function(req,res){
	res.send(“注册页面”);
});

app.listen(8080);
动态路由
动态路由使得我们不必向之前那样每一个路由路径都必须亲自设定,大大提高了开发上的效率,通过下面代码,在自定义路由之后,可通过req.params来获取路由信息:
const express = require("express");
var app = express();

app.get("/",function(req,res){
	res.send(`<h1>oh no</h1>`);
});
app.get("/login/:aid",function(req,res){
	res.send(req.params);
});

app.listen(8080);
get
获取get参数:
app.get("/login",function(req,res){
	console.log(req.query);
	res.send("登录路由,user为:"+req.query.user+"==>   password为:"+req.query.password);
});
post
使用npm提供的body-parser或者connect-multiparty来获取post数据
body-parser
Express中默认都使用body-parser作为请求体解析post数据,这个模块也能解析:JSON、Raw、文本、URL-encoded格式的请求体。
首先在项目目录安装body-parser:
npm install body-parser --save在项目app.js中,引用和设置该模块:
const bodyParser=require("body-parser");

// parse application/x-www-form-urlencoded
app.use(bodyParser.urlencoded({ extended: false }))
// parse application/json
app.use(bodyParser.json())
// 全局 中间件  解决所有路由的 跨域问题
app.all('*',function (req,res,next) {
    res.header('Access-Control-Allow-Origin','*')
    res.header('Access-Control-Allow-Headers','X-Requested-With,Content-Type')
    res.header('Access-Control-Allow-Methods','GET,POST,OPTIONS')
    next()
})
bodyParser.json()很明显是将json作为消息主体,再且常见的语言和浏览器大都支持json规范,使得json处理起来不会遇上兼容性问题。
application/x-www-form-urlencoded:
如果form表单不设置enctype属性,那么他默认就会是这种。
之后获取数据:
app.post("/",urlencodedParser,function(req,res){
    // req: 客户端 携带的信息
  // console.log(req.query)
  // console.log(req.params)
  console.log(req.body)
  // console.log(req.get('Origin'))
  // console.log(req.url)
	res.send(req.body);
});
在中间添加urlencodedParser,请求是依然使用req.body获取数据。
connect-multiparty
npm install connect-multiparty --save中间件
中间件也分为应用层中间件、路由中间件、内置中间件、错误处理中间件和第三方中间件。
应用层中间件
应用层中间件绑定到app对象使用app.use和app.METHOD()-需要处理http请求的方法,例如GET、PUT、POST,将之前的get或者post替换为use就行。
例如下面实例:
const express=require("express");

var app=express();

//匹配路由之前的操作
app.use(function(req,res){
	console.log("访问之前");
});

app.get("/",function(req,res){
	res.send("主页");
});

app.listen(8080);这时我们会发现http://localhost:8080/地址一直在加载,但命令行里显示了“访问之前”,说明程序并不会同步执行,如果使用next来是路由继续向下匹配,那么就能又得到主页数据了:
const express=require("express");

var app=express();

//匹配路由之前的操作
app.use(function(req,res,next){
	console.log("访问之前");
	next();
});

app.get("/",function(req,res){
	res.send("主页");
});

app.listen(8080);
当然也可以简化写法:
const express=require("express");

var app=express();

app.use(function(req,res,next){
	console.log("访问之前");
	next();
},function(req,res){
	res.send("主页");
});

app.listen(8080);
因此,在进行路由匹配之前又要继续向下执行时想做个操作,那么应用层中间件无疑是好的选择。
路由中间件
路由级中间件和应用级中间件类似,只不过他需要绑定express.Router();
var router = express.Router()在匹配路由时,我们使用 router.use() 或 router.VERB() ,路由中间件结合多次callback可用于用户登录及用户状态检测。
router.post('/postTest', (req, res, next) => {
  console.log('访问前')
  next()
}, function (req, res, next) {
  // req: 客户端 携带的信息
  // console.log(req.query)
  // console.log(req.params)
  console.log(req.body)
  // console.log(req.get('Origin'))
  // console.log(req.url)
  res.render('index', { title: 'Express' });
});
总之在检测用户登录和引导用户应该访问哪个页面是,路由中间件绝对好用。
错误处理中间件
顾名思义,它是指当我们匹配不到路由时所执行的操作。错误处理中间件和其他中间件基本一样,只不过其需要开发者提供4个自变量参数。
app.use((err, req, res, next) => {
        res.sendStatus(err.httpStatusCode).json(err);
});
一般情况下,我们把错误处理放在最下面,这样我们即可对错误进行集中处理。
// error handler
app.use(function (err, req, res, next) {
  // set locals, only providing error in development
  res.locals.message = err.message;
  res.locals.error = req.app.get('env') === 'development' ? err : {};
  logger.error(err.message)
  // render the error page
  res.status(err.status || 500);
  res.render('error');
});
内置中间件
从版本4.x开始,Express不再依赖Content,也就是说Express以前的内置中间件作为单独模块,express.static是Express的唯一内置中间件。
express.static(root, [options]);
1
通过express.static我们可以指定要加载的静态资源。root代表加载静态资源的路径,options作为可选参数拥有一下属性:
| 属性 | 描述 | 类型 | 缺省值 |
|---|---|---|---|
| dotfiles | 是否对外输出文件名以点(.)开头的文件。有效值包括“allow”、“deny”和“ignore” | 字符串 | “ignore” |
| etag | 启用或禁用 etag 生成 | 布尔 | true |
| extensions | 用于设置后备文件扩展名。 | 数组 | [] |
| index | 发送目录索引文件。设置为 false 可禁用建立目录索引。 | 混合 | “index.html” |
| lastModified | 将 Last-Modified 的头设置为操作系统上该文件的上次修改日期。有效值包括 true 或 false。 | 布尔 | true |
| maxAge | 设置 Cache-Control 头的 max-age 属性(以毫秒或者 ms 格式中的字符串为单位) | 数字 | 0 |
| redirect | 当路径名是目录时重定向到结尾的“/”。 | 布尔 | |
| setHeaders | 用于设置随文件一起提供的 HTTP 头的函数。 | 函数 | true |
以下示例将使用了 express.static 中间件,并且提供了一个详细的’options’对象(作为示例):
var options = {
  dotfiles: 'ignore',
  etag: false,
  extensions: ['htm', 'html'],
  index: false,
  maxAge: '1d',
  redirect: false,
  setHeaders: function (res, path, stat) {
    res.set('x-timestamp', Date.now());
  }
}

app.use(express.static('public', options));
Cookie
1.安装
npm install cookie-parser --save2.引入
const cookieParser=require("cookie-parser");3.设置中间件
app.use(cookieParser());4.设置cookie
res.cookie(名称,值,{配置信息})
res.cookie("name",'zhangsan',{maxAge: 900000, httpOnly: true});关于设置cookie的参数说明:
domain: 域名

name=value:键值对,可以设置要保存的 Key/Value,注意这里的 name 不能和其他属性项的名字一样

Expires: 过期时间(秒),在设置的某个时间点后该 Cookie 就会失效,如 expires=Wednesday, 09-Nov-99 23:12:40 GMT。

maxAge: 最大失效时间(毫秒),设置在多少后失效 。

secure: 当 secure 值为 true 时,cookie 在 HTTP 中是无效,在 HTTPS 中才有效 。

Path: 表示 在那个路由下可以访问到cookie。

httpOnly:是微软对 COOKIE 做的扩展。如果在 COOKIE 中设置了“httpOnly”属性,则通过程序(JS 脚本、applet 等)将无法读取到COOKIE 信息,防止 XSS 攻击的产生 。

singed:表示是否签名cookie, 设为true 会对这个 cookie 签名,这样就需要用 res.signedCookies 而不是 res.cookies 访问它。被篡改的签名 cookie 会被服务器拒绝,并且 cookie 值会重置为它的原始值。
5.获取cookie
req.cookie.name;下面是一个基础实例:
var express = require('express');
const cookieParser = require("cookie-parser");
var router = express.Router();
router.use(cookieParser())
/* GET home page. */
router.get('/', function (req, res, next) {
  res.cookie('token', '11111', {
    maxAge: 40000
  })
  res.render('index', { title: 'Express' });
});

router.post('/postTest', (req, res, next) => {
  console.log('访问前')
  next()
}, function (req, res, next) {
  // req: 客户端 携带的信息
  // console.log(req.query)
  // console.log(req.params)
  console.log('req.cookies',req.cookies)
  console.log(req.body)
  // console.log(req.get('Origin'))
  // console.log(req.url)
  res.render('index', { title: 'Express' });
});

module.exports = router;
当访问set路由后会设置cookie,当访问get路由后会获取到设置的cookie值。当然你也可以在其他页面继续获取当前cookie,以实现cookie共享。
三、多个二级域名共享cookie
只需要增加res.cookie中option对象的值,即可实现对相应路由下多个二级路由的cookie进行共享,代码如下:
const express=require("express");
const cookieParser=require("cookie-parser");

var app=express();

//设置中间件
app.use(cookieParser());

app.get("/",function(req,res){
	res.send("首页");
});

//设置cookie
app.get("/set",function(req,res){
	res.cookie("userName",'张三',{maxAge: 200000, httpOnly: true,domain: "ccc.com"});
	res.send("设置cookie成功");
});

//获取cookie
app.get("/get",function(req,res){
	console.log(req.cookies.userName);
	res.send("获取cookie成功,cookie为:"+ req.cookies.userName);
});

app.listen(8080);
session
我们使用express-session模块来设置session
1.安装express-session
npm install express-session --save2.引入express-session模块
const session=require("express-session");3.设置session
session(options);如下列代码:
var express = require('express');
const cookieParser = require("cookie-parser");
const session=require("express-session");

var router = express.Router();
router.use(cookieParser())
router.use(session({
	secret: "keyboard cat",
	 resave: false,
	 saveUninitialized: true,
	 cookie: ('sesionToken', '123123',{maxAge:  5*60*1000,secure: false})
}));

/* GET home page. */
router.get('/', function (req, res, next) {
  res.cookie('token', '11111', {
    maxAge: 40000
  })
  //设置session
	req.session.userName='kif';
  res.render('index', { title: 'Express' });
});

router.post('/postTest', (req, res, next) => {
  console.log('访问前')
  next()
}, function (req, res, next) {
  // req: 客户端 携带的信息
  // console.log(req.query)
  // console.log(req.params)
  console.log('req.cookies',req.cookies)
  console.log('req.session.userName',req.session.userName)
  console.log(req.body)
  // console.log(req.get('Origin'))
  // console.log(req.url)
  res.render('index', { title: 'Express' });
});

module.exports = router;
在session(option)中对session进行设置,它的主要参数是:
1. name - cookie的名字(原属性名为 key)。(默认:’connect.sid’)
2. store - session存储实例
3. secret - 用它来对session cookie签名,防止篡改
4. cookie - session cookie设置 (默认:{ path: ‘/‘, httpOnly: true,secure: false, maxAge: null })
5. genid - 生成新session ID的函数 (默认使用uid2库)
6. rolling - 在每次请求时强行设置cookie,这将重置cookie过期时间(默认:false)
7. resave - 强制保存session即使它并没有变化 (默认: true, 建议设为:false)
8. proxy - 当设置了secure cookies(通过”x-forwarded-proto” header )时信任反向代理。当设定为true时,
”x-forwarded-proto” header 将被使用。当设定为false时,所有headers将被忽略。当该属性没有被设定时,将使用Express的trust proxy。
9. saveUninitialized - 强制将未初始化的session存储。当新建了一个session且未设定属性或值时,它就处于未初始化状态。在设定一个cookie前,这对于登陆验证,减轻服务端存储压力,权限控制是有帮助的。(默认:true)
10. unset - 控制req.session是否取消(例如通过 delete,或者将它的值设置为null)。这可以使session保持存储状态但忽略修改或删除的请求(默认:keep)
三、session的常用方法
//设置session
req.session.username="张三"

//获取session
req.session.username

//重新设置cookie的过期时间
req.session.cookie.maxAge=1000;

//销毁session
req.session.destroy(function(err){

})
以下演示通过销毁session的方式来退出登录
const express=require("express");
const session=require("express-session");

var app=express();

//配置中间件
app.use(session({
	secret: "keyboard cat",
	 resave: false,
	 saveUninitialized: true,
	 cookie: ('name', 'value',{	maxAge:  5*60*1000,
								secure: false,
								name: "seName",
								resave: false})
}));

app.use('/login',function(req,res){
	//设置session
	req.session.userinfo='张三';
	res.send("登陆成功!");
});

app.use('/loginOut',function(req,res){
	//注销session
	req.session.destroy(function(err){
		res.send("退出登录!"+err);
	});
});

app.use('/',function(req,res){
	//获取session
	if(req.session.userinfo){
		res.send("hello "+req.session.userinfo+",welcome to index");
	}else{
		res.send("未登陆");
	}
});

app.listen(8080);
当我们进入到主页时,未显示任何信息,进入login路由后,自动设置session,这是回到主页则显示session信息,之后进入loginOut路由已注销session信息,再回到首页显示为登陆。
jade模板引擎
安装jade:
npm install jade --save在程序中引入jade:
app.set('views', path.join(__dirname, 'views'));
app.set('view engine', 'jade');
app.engine('jade', require('jade').__express);
特定路由渲染:
app.use("/",function(req,res){
	res.render("index.jade");
});
完整实例:
const express=require("express");
const jade=require("jade");
const fs=require('fs');
var app=express();

//引用jade
app.set('views',"public");	//设置视图的对应目录
app.set("view engine","jade");		//设置默认的模板引擎
app.engine('jade', jade.__express);		//定义模板引擎

//获取jade文件
var str=jade.renderFile("./public/index.jade",{pretty:true});
console.log(str);

app.use("/",function(req,res){
	res.render("index.jade");
});

app.listen(8080);
jade基础语法
1、jade对很多html操作进行了简化,如下:
html
	head
		style
	body
		div(class="content")
			h1 正文
了解过html语句的,从结构上一定会发现,它将原本的双标签省略了,尖括号也不见了,而层级的划分则由缩进实现,默认的,jade会把几乎所有缩进后的字母变为标签(行内元素)。以下代码会变为:
<html>
  <head>
    <style></style>
  </head>
  <body>
    <div class="content">
      <h1>正文</h1>
    </div>
  </body>
</html>
也将用div(class=”content”)代表,简化了代码的书写;
2、“|”符号的作用
有时我们想让我们的标签成为文字,那么“|”成为了绝好的工具:
div(class="content",id="content")
			| center
我们可以看到,他将center作为文字原封不动的写入了html中,而不是作为一个标签渲染。
当然我们用它来转换js语句:
script
		| var cli = document.getElementById("content");
		| cli.onclick=function(){
		|	alert("aaa");
		| }
他将会变为:
<script>
    var cli = document.getElementById("content");
    cli.onclick=function(){
        alert("aaa");
    }
</script>
3、识别js语句:
可以通过 script. 来识别js语法:
script.
		var cli = document.getElementById("content");
		cli.onclick=function(){
			alert("aaa");
		}
他也会变为:
<script>
    var cli = document.getElementById("content");
    cli.onclick=function(){
        alert("aaa");
    }
</script>
我们可以看到,相比于用 | 使用script. 更加方便快捷。
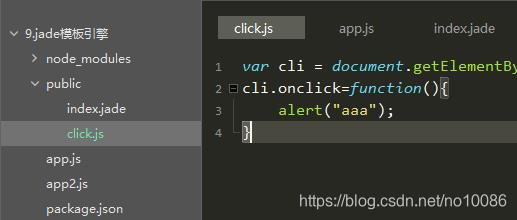
4、引入其他js文件:
想在jade的js标签中引入其他js文件?没错,它也支持。前提请确保他们在同一文件夹下:
script
		include click.js
12
<script>var cli = document.getElementById("content");
	cli.onclick=function(){
       		alert("aaa");
	}
</script>
5、表达式
“-”允许我们直接写js语法,在变量调用时,通过 #{a+b} 或 div=a+b 进行:
html
	head

	body
		-var a=10
		-var b=20
		div a+b为:#{a+b}
		div=a+b
会得到:
<html>
  <head></head>
  <body>
    <div>a+b为:30</div>
    <div>30</div>
  </body>
</html>
6、for循环:
“-“也可以用于循环语句的使用
html
	head

	body
		-var arr=0;
		-for(var i=5;i>arr;i--)
			div=i
		div the number = #{i}
得到:
<html>
  <head></head>
  <body>
    <div>5</div>
    <div>4</div>
    <div>3</div>
    <div>2</div>
    <div>1</div>
    <div>the number = 0</div>
  </body>
</html>
7、case ,when
类似于switch case语句:
html
	head

	body
		- var test = "汉子"
		-var none = "无"
		div The word is #{test}
		case test
			when "a": div the when is a
			when "b": div the second is b
			when "汉子": div the Third is 汉子
			default: The words is #{none}
得到:
<html>
  <head></head>
  <body>
    <div>The word is 汉子。</div>
    <div>the Third is 汉子</div>
  </body>
</html>
类似于switch case,只执行when中与case对应的代码块,在匹配后面用 : 来作为要执行的代码,后面跟上标签和对应语句
8、if else条件判断
html
	head

	body
		-for(var i=12;i>0;i--)
			-if(i%2==0)
				div(style={background:'#eee',width:'100%',height:'20px',color: '#333'})	偶数
			-else
				div(style={background:'#333',width:'100%',height:'20px',color: '#eee'})	奇数
得到:
<html>
  <head></head>
  <body>
    <div style="background:#eee;width:100%;height:20px;color:#333">     偶数</div>
    <div style="background:#333;width:100%;height:20px;color:#eee">     奇数</div>
    <div style="background:#eee;width:100%;height:20px;color:#333">     偶数</div>
    <div style="background:#333;width:100%;height:20px;color:#eee">     奇数</div>
    <div style="background:#eee;width:100%;height:20px;color:#333">     偶数</div>
    <div style="background:#333;width:100%;height:20px;color:#eee">     奇数</div>
    <div style="background:#eee;width:100%;height:20px;color:#333">     偶数</div>
    <div style="background:#333;width:100%;height:20px;color:#eee">     奇数</div>
    <div style="background:#eee;width:100%;height:20px;color:#333">     偶数</div>
    <div style="background:#333;width:100%;height:20px;color:#eee">     奇数</div>
    <div style="background:#eee;width:100%;height:20px;color:#333">     偶数</div>
    <div style="background:#333;width:100%;height:20px;color:#eee">     奇数</div>
  </body>
</html>
9、style的写法:
在对style样式进行修改时,与script相同,也可使用 . 对其进行编辑,之后对不同的标签在其后面加{},大括号里写css语句1,并使用 ; 隔开
html
	head
		meta(charset="utf-8")
		title jade测试页面
		style.
			body{margin:0;padding:0}
			div
			{width: 100px;height: 100px;background: #ccc;text-align: center;line-height: 100px;margin: 10px auto}
			div.last{clear:left}
	body
		-var a=0;
		while a<12
			if a%2==0 && a!=0
				div.last=a++
			else
				div=a++
得到:
<html>
  <head>
    <meta charset="utf-8"/>
    <title>jade测试页面</title>
    <style>
      body{margin:0;padding:0}
      div
      {width: 100px;height: 100px;background: #ccc;text-align: center;line-height: 100px;margin: 10px auto}
      div.last{clear:left}
    </style>
  </head>
  <body>
    <div>0</div>
    <div>1</div>
    <div class="last">2</div>
    <div>3</div>
    <div class="last">4</div>
    <div>5</div>
    <div class="last">6</div>
    <div>7</div>
    <div class="last">8</div>
    <div>9</div>
    <div class="last">10</div>
    <div>11</div>
  </body>
</html>
10、Mixin
Mixin的作用是对模块的复用,当重复代码有不同内容时,起作用就来了:
- var num = 0;
mixin node
    div The number in mixin node is #{num++}
+node()
+node()
+node()
div At last, the number in mixin node is #{num++}
得到:
<div>The number in mixin node is 0</div>
<div>The number in mixin node is 1</div>
<div>The number in mixin node is 2</div>
<div>At last, the number in mixin node is 3</div>
以上则是jade的一些常用语法,如果平常使用jade作为开发,那么这些是非常基础的,也希望大家有所体会
express连接mysql
在确保mysql数据库已开启的情况下,直接使用mysql.creatConnection(option,callback);
具体如下:
先安装mysql数据库:
npm install mysqll --save引入mysql模块:
const mysql = require("mysql");之后仅需在代码中添加如下:
var db=mysql.creatConnection({host:'localhost',port:'3306',user:"root",password:'password',database:'dataName'});

db.query('sql语句',(err,data)=>{
	if(err){
		console.log('出错了!',err);
	}else{
		console.log("成功!",JSON.stringify(data));
	}
});
如下实例:
const express=require("express");
const mysql=require("mysql");

var app=express();

//连接数据库
var db=mysql.createConnection({host: "localhost",
							port: "3306",
							user: "root",
							password: "123456",
							database: "new_lib"});
//2.发送请求(查询)
db.query("SELECT * FROM students",function(err,data){
	if(err){
		console.log("数据库访问出错",err);
	}else{
		console.log(data);
	}
})

app.get("/",function(req,res){
	res.send("express");
});

app.listen(8080);
二、mysql的基本语法
mysql基本分为增,删,改,查四部分,其中又以查为中心,毕竟对数据进行筛选管理是最频繁的。
1.增
顾名思义,即为向数据库添加数据,它用到的关键字为:INSERT
INSERT INTO table_name ( 字段1,字段2,...字段N )
                       VALUES
                       ( 值1, 值2,...值N );
2.删
一般删除数据都会设立一个条件,如where指令,他可以指定任何条件。一般语法是:
DELETE FROM table_name [WHERE Clause]值得注意的是:
如果没有指定 WHERE 子句,MySQL 表中的所有记录将被删除。
3.改
修改也需要通过查找到对应数据来进行修改:
UPDATE table_name SET field1=new-value1, field2=new-value2
1
当然,修改也能一次性修改多条数据,只要查询条件满足。
4.查
mysql基本分为5种查询方式:
where:条件查询
group by:分组
having子句:有group by才能having子句,只有满足“条件表达式”中指定的条件的才能够输出。
order by:排序
limit:记录数
12345
1、where
where支持基本运算符:>,>=,<,<=,!=,=,in(在集合内),between(在某范围内)、以及逻辑运算符:not或!(非)、or或||(或)、and或&&(与)
2.group by
相当于合并统计,通常和聚合函数同时使用,如下面的例子:
*统计每个班的平均分(student_table)

ID		class	  name			scroe
"1"		"1"		"小虎"			"36"
"2"		"2"		"小胖"			"56"
"3"		"1"		"小明"			"48"
"4"		"2"		"小心"			"66"
"5"		"3"		"小刚"			"71"
"6"		"4"		"小强"			"46"
"7"		"4"		"小达"			"51"
"8"		"1"		"小贺"			"80"

SELECT class,AVG(scroe) FROM student_table GROUP BY class;
12345678910111213
3.having
having的用法和where类似,一个在form后,一个在group by后面;就是说其是对group by后的信息进行筛选。having筛选时,只能根据select子句中可出现的字段(数据)来进行条件设定。
如下面例子:
数据还是上面那个
筛选出平均成绩大于60的班级:

SELECT class,AVG(scroe) FROM student_table GROUP BY class HAVING AVG(scroe)>60 ;
1234
4.order by
order by用于对数据进行排序:
ORDER BY age ASC	//升序
ORDER BY age DESC	//降序

*价格排序(price)升序排序,再按销量(sale)降序排序:
ORDER BY price ASC,sale DESC
12345
5.limit
limit用于查询需要的数据量,它接受一到两个整数参数。如果给定两个参数,第一个参数指定第一个返回记录行的初始量(默认初始为0),第二个参数指定返回记录行的最大数目。
查询第5-10个选择的数据
SELECT * FROM table LIMIT 5,10;


